Nothing is more frustrating than hearing that persistent drip, drip, drip coming from your bathroom faucet. Beyond the annoyance factor, a leaky tap also means unnecessary water waste and potentially increases your water bills over time. If you’ve been meaning to address a troublesome leaky Grohe faucet in your home but haven’t been sure where to start, you’ve come to the right place.
In this blog post, I will walk you through troubleshooting and repairing a leaky Grohe bathroom faucet in simple, easy-to-follow steps. Grohe produces high-quality faucets, but like any fixture, seals and washers can degrade regularly and result in dripping. The good news is that many common Grohe faucet leaks can be fixed independently at home with just a few essential tools and replacement parts.
By the end of this post, you’ll understand the most common causes of leaky Grohe faucets and know precisely how to resolve them. I’ll explain how to disassemble your specific faucet model, inspect for issues, and replace worn components. You can say goodbye to leaks with the proper maintenance approach! Regaining control over your faucet and preventing water waste is incredibly satisfying. So, let’s get started and have you back to enjoying leak-free water in no time.
How to Fix a Leaky Grohe Bathroom Faucet?
Tools and Materials You Will Need:
- Get ready by collecting these essential tools and materials:
- Adjustable wrench
- Screwdriver (Phillips or flathead, depending on your faucet model)
- Replacement parts (o-rings, cartridges, or valve seals specific to your Grohe faucet model)
- Plumber’s grease or silicone-based lubricant
- Clean cloth or towel
- Penetrating oil (if necessary for stubborn or rusted parts)
Step 1: Turn Off the Water Supply:
Safety should always be the top priority before beginning any home or appliance installation.
Start by closing the water lines. Locate the shut-off valves under the sink carefully. These are usually quarter-turn valves that stop water flow with a simple clockwise twist. Control over the supply lines is essential for keeping things dry throughout the process.
If individual shut-offs aren’t installed for the faucet lines specifically, you may need to turn off the main water inlet to the home instead. This whole house shut-off is often found where exterior supply pipes enter the foundation. Make sure any stubborn old shut-off valves fully seal the flow before proceeding.
Also, protect surrounding surfaces by laying down drop cloths under the faucet area. This catches any accumulated mineral deposits or solder flakes dislodged while removing old fixtures. Messy work can be minimized with attentive preparation.
Once supply lines are sealed, release any trapped pressure in relevant pipes by gently tapping faucet openings or disconnecting hoses reattached later. Taking simple safety steps like completely closing valves helps prevent potential flooding issues during installation.
With water sources carefully secured, your new fixture change can proceed smoothly. Proper planning for plumbing preserves your property – allowing creative installation focus without the fear of surprise soaks. Faucet fittings and finishes flow freely when safe supply handling policies pave the way.
Step 2: Remove the Faucet Handle:
First, take a moment to visually inspect the handle cap and screw area closely. Different manufacturers may require specialty tools, so gather appropriate screwdriver heads, pliers, or other hardware in advance as needed.
Gently pry off decorative cap pieces in a controlled scraping motion using a small flathead screwdriver. Patience protects paint here – rash removal risks scratches or chips.
Once the cover reveals mounting screw slots, start threading counterclockwise slowly. Often, mineral buildup within hinders initial spins, so calm yet consistent counter-rotation loosens residue safely without stripping.
As hardware gives way, support the exposed handle steadily with one palm. This stabilizes parts while unwinding final coils, preventing sudden shifts or drops that cause damage.
When entirely freed, lift straight up, not bending delicate metal connections within. Place handle pieces in a safe, organized workspace to remain in order. This layout streamlines reinstallation later, too.
With steady hands and an attentive eye for detail, even complex components come apart and back together seamlessly. Taking extra time upfront protects fixtures and homeowners in the long run.
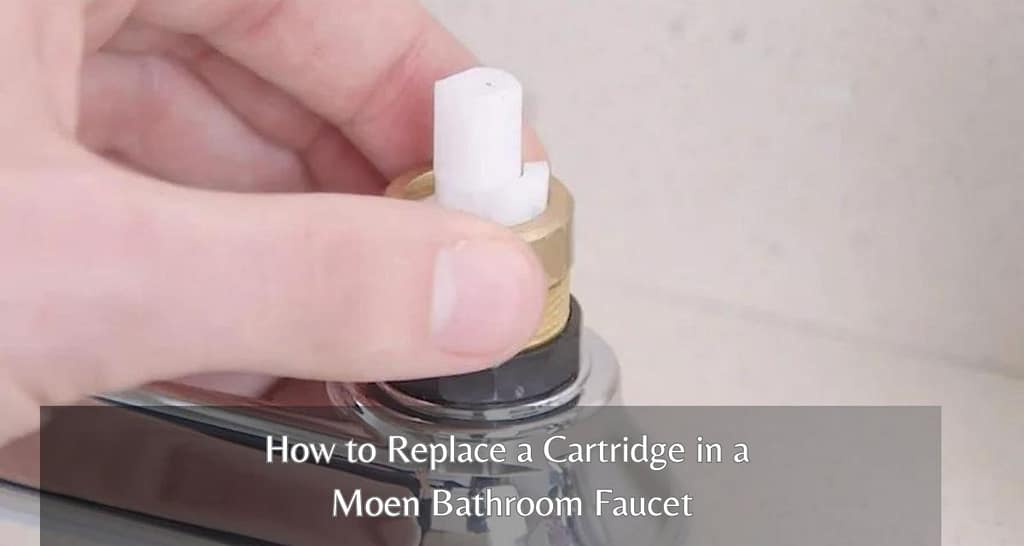
Step 3: Inspect and Replace O-rings:
Once handles are removed, mindfully examine the inner cartridge components. Look carefully for cracks, worn notches, or signs of mineral buildup that could indicate deeper issues affecting water flow or pressures.
In particular, inspect the condition of flexible O-ring seals cradling the cartridge. These tight rubber gaskets are hydraulic workhorses, constantly expanding and contracting with each use cycle. Over the years, their delicate structure can understandably weaken.
Gently wriggle or tease out tired O-rings using non-marring tools like blunted toothpicks or wooden dental tools. Avoid metal instruments that might abrade seal surfaces. Once separated, closely compare old components against fresh replacements for proper sizing.
When fitting new O-rings, I apply a gossamer film of pure silicone lubricant or plumber’s grease. This natural coat improves flexibility, ensuring smooth, lasting adhesion under load. Too much produces slippage, though, so use it sparingly.
Seal rings should press on securely but without creasing. Their contoured fit creates a pressure-tight barrier against leak hazards. Protected properties and carefree fixtures result from conscientious cartridge refurbishing with quality components. Overall, minor maintenance makes major malfunctions much more manageable to mitigate.
Step 4: Replace the Cartridge or Valve:
Another critical juncture is determining if O-ring changes sufficiently improve seals or if a complete cartridge upgrade may better restore peak performance.
Should leaks persist after the refresh, time is invested in examining technical manuals closely. There, precise component specifications decode replacements required like puzzle pieces fitting together flawlessly.
Manufacturers also often offer direct support avenues through online databases or on-call representatives. Qualified experts possess in-depth insights on particular make/model intricacies to diagnose core issues properly.
Follow original installation guidance here, as engineered sequences streamline refits securely. Carefully disconnect all residual supply lines, hose, or mounting hardware connecting outdated cartridges first to extract fully and safely.
Inspect replacements matching dimensions precisely before reinsertion. Apply lubrication again as instructed, then manipulate smoothly back inward hand-over-hand until fully seated with no binding resistance.
Before reconnecting waterways, gently test the operation without pressure by actuating handles. Look closely for grinding noises indicating misaligned or improperly fitted pieces needing realignment first.
With due process properly pursued, quality refurbishments maximize fixture lifespans satisfactorily for all household members’ streamlined comfort. Diligent do-overs decrease dependency on costlier replacements down the line to keep cash circulating constructively within families.
Step 5: Reassemble and Test:
Start by slowly twisting handles back into place, taking time to thread securing screws by fingertips fully. Their precise position governs watertight integrity, so double-check flush mounting before snugging the final coils.
Replace any cosmetic covers that shield threads and add polished finishes. Test fitting ensures proper closure without pinch points hampering future use first. Only re-engage the necessary supply port and hose connections in reverse disconnection order.
With components reunited, gradually restore water flow by cracking main shut-off lines incrementally. Vigilant watching safes hazards from sudden surges as fixtures repressurize. Keep extras like towels or buckets ready if minute pinhole weeps require wipe-ups.
Once the circuits are complete, inspect each fitting junction methodically under realistic use simulations. Gently manipulate handles through full rotation cycles, noting any new damp spots. Paying close mindfulness now saves much more significant issues down the line.
When performance satisfies, you’ve earned relaxation from a job well done. Home repairs bring deep fulfillment through independent solutions and improved everyday living efficiencies for all household members. Most importantly, safe faucet servicing prevents costly plumbing nightmares and keeps you hydrated to help another in need soon!
Additional Tips:
When tackling any home improvement project, it’s always a good idea to start by closely examining what you’re working with. In the case of a faucet repair, take some time to inspect each component – you’ll be surprised what a fresh set of eyes can reveal. Loose parts that need tightening? Rust or debris buildup in hard-to-see spots? Taking stock beforehand will help the rest of the job go smoother.
Speaking of smoother, one nice little trick is to hit any stubborn screws or fittings with penetrating oil before attempting removal. Just a spritz or two, let it soak in for 10 minutes, can make a difference. Rust and mineral deposits lock things down over time, so the oil helps break through that bond so parts come off quickly. I like to keep a small can handy just for situations like this.
And once components start coming apart, don’t just toss them in a pile! Taking a few extra moments to scrub each piece under warm, soapy water pays off. You’d be shocked what gunk accumulates in there over the years. Getting rid of all that crud means new seals and washers have a pristine surface to sit against. A squeaky-clean canvas makes for smoother functionality in the long run.
Of course, none of us is a pro at everything. So if you hit a snag you can’t muscle past, there’s no shame in putting the project on pause. It’s better to walk away for a bit than risk further damage. You can always bring in an expert to have a look – most will be happy to point you in the right direction, even if they end up fixing it. Home repairs are a learning process, so don’t be afraid to ask for guidance.
With some care and know-how, handling essential faucet maintenance is doable. Just take it step-by-step, and don’t be in a rush. Soon, you’ll be back enjoying fresh, clean water with the satisfaction of doing it yourself!
Conclusion
Fixing a leaky Grohe bathroom sink faucet is a manageable task that can save you money on water bills and prevent further damage. Following the step-by-step guide outlined above, you can identify and address common causes of faucet leaks, such as worn-out O-rings or faulty cartridges. Remember to exercise caution, refer to your faucet’s user manual, and seek professional assistance. With patience and the right tools, you can restore your Grohe bathroom faucet’s functionality and enjoy a leak-free, efficient plumbing system again.