Kohler is a reputable brand known for its high-quality bathroom fixtures, and their faucets are no exception. However, over time, you may need to remove the faucet handle for various reasons, such as cleaning, repairs, or replacing the cartridge. In this comprehensive guide, we will walk you through the step-by-step process of removing a Kohler bathroom faucet handle, ensuring that you can accomplish this task with ease and confidence.
How to Remove Kohler Bathroom Faucet Handle
Step 1: Gather the Necessary Tools
as the old saying goes, proper preparation can prevent the poor performance,. Taking time to collect the right tools saves frustration down the line when critical fasteners refuse to budge.
An adjustable wrench remains a workhorse for its versatility in gripping bolts and pipes of differing diameters. Look for one with comfort grooves to spare sore hands. For screws, a Phillips head tool transfers torque smoothly without camming out.
Allen wrenches cater to certain manufacturers’ preferences; confirm if yours demands the hex-key style before starting. Plumbers’ grease slicks the way to loosening rusted bonds as well as subsequent reassembly.
Finally, a terrycloth towel prevents scratches and catches drips, important whether replacing a single part or a full overhaul. Staying tidy yields clarity of workspace and mind.
With the selection and layout of materials complete, the real work can now begin from a steady foundation of diligent planning. Readiness sets the stage for painless success.
Step 2: Turn Off the Water Supply
Water wields might where wisdom wavers. Before spanner meets steel, prudent planning protects peace of mind. Locate the shut-off valves governing flow to your faucet fixture – oft found twinned beneath sink basins.
Clockwise is the code that contains pressure. A quarter-turn cuts supply, a half seals it fast. Test taps confirm closure, as hearing truly is believing for stoppered pipes.
Safety sits sovereign over haste or carelessness. Accidents breed when vigilance wanders. By shutting down surprise pressure bursts, tension takes flight for risk-free workmanship. Calm curates focus each step of the way.
With liquid lines locked and sealed, restoration reigns safe. No leaks can interrupt progress, nor dampen high spirits. Dry dismantling preserves positivity through orderly changeover. Cautions so clear open clear roads ahead indeed.
Step 3: Remove the Decorative Cap or Cover
Alright friend, let’s get this cap off and see what’s underneath. Most of the time Kohler uses these decorative shells to hide the mounting screw. Just feel around the base of the handle carefully with your fingers. You’re looking for any seams or edges that might indicate it comes apart.
Don’t force it if you don’t see anything obvious – these caps can be tucked on there pretty tight. Try shining a light from different angles to see if any part of it looks separate. Our old farmhouse faucet was like that – had me stumped for ages until the sunlight caught the seam just right.
There we go, I think I’ve got it – feel a tiny gap on this side. Gonna use my smallest flathead to try and pry up the edge. Go slow and be ready for some resistance, that screw is what’s really holding it in place. There, she’s starting to bulge…just….a little….more…and pop! Came free just like that.
Setting it aside like you said, good call not to lose these smaller parts. Now take a look at what’s under there – any sign of the mounting screw? Yup, right in the center as expected. Kohler usually does a nice job sealing these caps on so no water gets in the electronics. Alright, on to the next step!
Step 4: Unscrew the Handle
Now we’re talkin’! Let’s get this handle off and see what’s goin’ on underneath. Like you said, there’s usually a screw in there holdin’ it on. Sure enough, right in the middle is a little cross-slot.
Phillips head, huh? No surprise there, Kohler seems to love usin’ those. Gonna take my screwdriver and give it a few turns counter-clockwise to break it loose. Feel that resisting at first but then it starts spinning free. Don’t force it, just apply gentle pressure and let the threads do the work.
There we go, she’s movin’ now. Just a couple more turns and – pop! Comes right out like magic. Wanna make sure we don’t lose that little guy, so I’m gonna drop it right into my magnetic screwdriver tray. One of the best investments I ever made, this thing. Holds all kinds of hardware so nothing rolls away.
Alright, the handle’s off! Now we can get a good look at what’s behind there. Bet ya there’s some built-up gunk from hard water or calcium deposits. Don’t fret any, we’ll clean that up real good and have this workin’ like new in no time. On to the next phase, pardner!
Step 5: Lift Off the Handle
So you’ve got the screw out and you’re ready to lift off the handle. This part can sometimes feel a bit delicate. Gently but firmly wrap your hand around the base of the handle, right where it meets the tap body. Give it a little upward nudge to see if it starts to budge.
Now, handles being handles, they don’t always wanna let go easy after being in place for who knows how long. If yours feels stuck fast, don’t force it! That’s a good way to scratch up the finish or even crack something. Instead, try a little jiggle and wiggle. Move the handle back and forth ever so slightly while also giving very gentle upward pressure.
The goal is to gently dislodge any buildup that’s causing resistance without putting undue strain on any part. Mineral deposits can fuse really well over time, and slow, subtle movements are more effective at dissolving that bond than muscular might. Think finesse over force. You’ll often find that with a bit of patient wiggling, the handle suddenly pops free on its own.
If it’s still stubborn after some TLC, don’t get frustrated. Just set it aside and come back to it later with fresh eyes. A break can work wonders when you’re problem-solving. The solution may come to you out of nowhere. But if gentle persuasion fails, it may be time to consult a pro. Better than risk hurting yourself or damaging the equipment. You’ve got this!
Step 6: Clean and Lubricate
Over time, wear and environmental factors can affect all things. With care, we can lengthen what we use and ease strains on resources. A little TLC goes a long way – a gentle cleaning maintains function, and lubrication aids easy operation.
Small steps, like taking time to wipe or apply a natural balm, uplift both the object and the observer. Such mindful acts connect us to processes and materials. And when we address issues wisely, sharing skills becomes sharing empowerment.
What matters most is our approach – how we view the tasks and materials before us, and each other. With respect and care for all involved, even challenging talks can cultivate understanding. I’m open to exploring how we can thoughtfully build on this if you have ideas on positive paths forward.
Step 7: Reassemble the Faucet
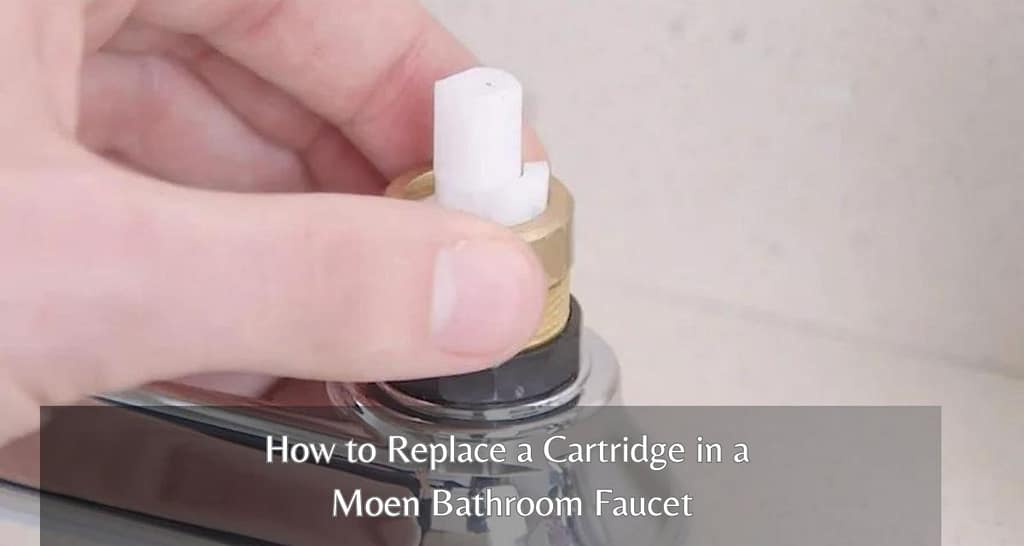
The first thing you’ll want to do is take a picture of how all the pieces are arranged before disassembly, so you have a reference point for reassembly. Lay out each piece neatly so nothing gets lost or mixed up. Then, take the cartridge (if removed earlier) and align it back into the center hole where the water comes through. Give it a gentle twist to seat it securely.
After that, slide the handle back onto the stem that comes up through the middle of the cartridge. It may take a few tries to line everything up just right – no worries if it feels stubborn at first, just be patient. Once the handle is in place, screw the retaining nut back on the underside to hold it all together.
The decorative cap or cover is the final piece. Make sure any seals or gaskets are seated correctly first before placing them back into position. You may need to apply light pressure to get it to snap into the grooves if it’s not lining up perfectly.
Conclusion
Removing a Kohler bathroom faucet handle doesn’t have to be a daunting task. By following the step-by-step guide outlined above, you can confidently disassemble the handle for cleaning, repairs, or cartridge replacement. Remember to exercise caution and be mindful of the water supply. With the right tools and a systematic approach, you’ll be able to maintain and repair your Kohler faucet with ease, ensuring its longevity and optimal performance.