
Constipation and clogging are the two most common problems encountered by food waste disposers. On the positive side, every owner of these machines has encountered them at least once. And man, they’re really a nuisance.
Normally we’d call plumbers, right? They are the safest bet for this type of problem.
But what if you don’t have time to wait for the pros? What if you want to save money? What if a friend needs help and you have a chance to be the hero? Knowing how to fix garbage disposals would come in handy one day.
And you know what’s even better?
These traffic jams and obstacles are not difficult to fix. Once you understand what causes them and what to do about them, unless it’s a problem with your home’s main plumbing system, you’ll save a lot of money and time by fixing them yourself.
Let’s try to find out what makes garbage collectors suddenly act the way they do. Later we will see together what can be done to solve these problems and prevent them from reoccurring (or at least minimize the number of cases).
Your garbage disposal isn’t working Anymore?
Surprisingly (or not), in most cases, computers that don’t work are nothing more than the users’ fault. For whatever reason, many use their rubbish collection as rubbish bins. We need to understand something: Garbage shredders are designed to deal with food waste and only food waste.
Sometimes the motor seems powerful enough to shred other things, but trying to try this will definitely damage the machine permanently. So not.
If you ever rebelliously or carelessly feed the machine a foreign object such as a coin or a metal spoon or even a rubber band (basically anything the machine can’t grind), except that it gets stuck.
In other cases, some garbage disposals are weaker than others and require gentler hands to handle. It’s best to feed the litter slowly and avoid large amounts of bone (or any bone at all) or fibrous materials. When the machine is overloaded, the
circuit breaker stops operating to protect it / the motor.
In summary, there are two common reasons why computers are not working properly:
- Foreign bodies stuck in the grinding chamber
- Circuit breaker responds to overload
Is Your Garbage Disposal Clogged?
Well, the clog is another story. While clogging is a mechanical problem, clogging is more maintenance related. The same applies to a sink without a disposal unit.
If too much dirt accumulates, the drain will become clogged. The only difference is that now the pipes under the sink have a really big piece down the middle.
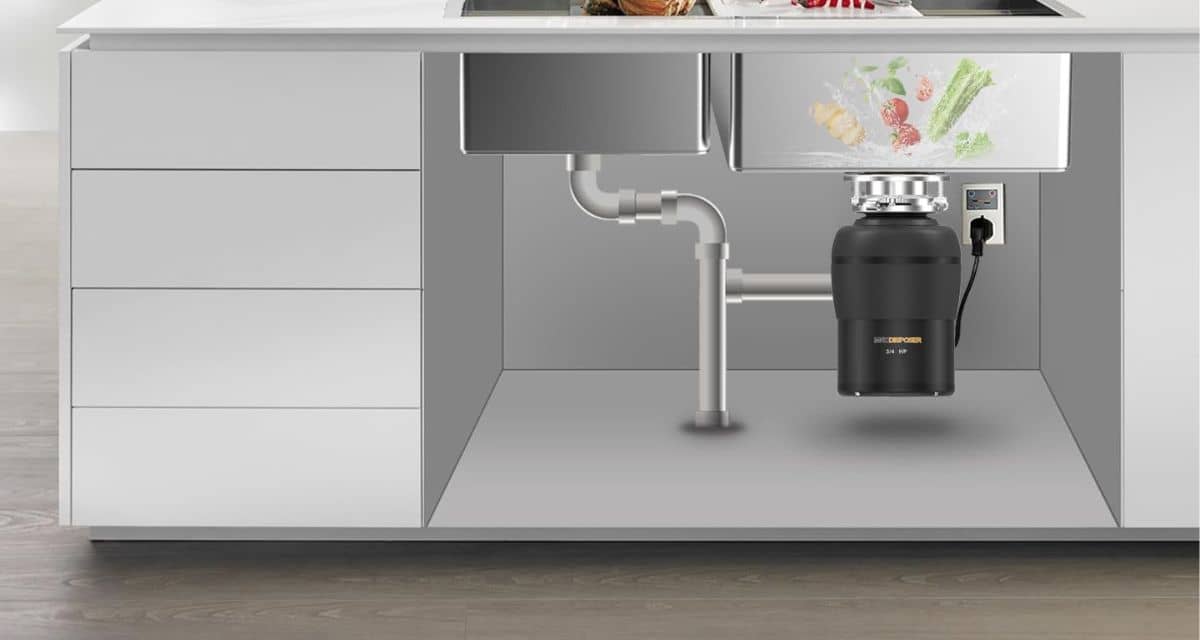
It’s definitely not about strong and weak machines. Even if you have something like the Waste King L-8000 with a 1hp motor that’s comparatively powerful but doesn’t put much effort into daily trash or routine cleaning, clogs will definitely end up piling up. p>
It’s true that more powerful machines help achieve finer grinds that reduce the risk of clogging.
But the ⅓ or ½ HP models won’t drop big chunks down the drain either.
Dealing with clogs isn’t about fixing them, it’s more about cleaning and learning the basics of handling care of the pipes and the device.
How To Repair Your Garbage Disposal?
Once you understand the reasons, it should now be easier to fix these occurrences. But life is seldom so comfortable. If these suggestions don’t work for your situation, seek professional help.
But first, let’s see how well we do.
Troubleshooting a Garbage Disposal
There are two causes: When the circuit breaker has tripped or something is pinched between the plate and the ring. We need to be able to tell them apart, as each one’s way of “untangling” is different.
If the machine stops suddenly in the middle of the session and there is no sound, does this mean the power is off, you might want to take a look at the payload it’s processing. This is most likely the work of the circuit breaker.
If the machine stops spinning and buzzes when you try to turn it off, then something is preventing the platter from spinning even though the motor is running.
- Circuit breaker reacts to overload
- It’s easier with overload. You don’t need any tools.
Basically, just wait for the machine to recover, realize your machine has a limit, and slow down from there. Anyway, that’s what you need to do.
- First, switch off the machine.
- Look for the reset button (on the bottom or under the device). It should extend (about ¼ inch or 5mm
- Reset the garbage collection by pressing the button, then turn on the machine.
Yes No Do not enter, let the machine sit for 10 minutes before restarting it.
(Even if it stalls on the first try, we still recommend letting it sit for a few minutes.)
This should get the food waste disposer back to normal.
- Foreign things stuck in the grinding chamber
If the machine is humming, we need to remove the obstacles from the chamber and unclog the blockage manually sew.
Tools we’ll need: jam buster wrench, pliers, and a flashlight.
- Make sure your device is powered off.
- Use Allen/counter wrench (for units with hex hole) or long-handled tool (for units WITHOUT hex hole).
- With the wrench: There should be a hexagonal hole under the device to insert the wrench. Move the wrench like a handle and slowly turn the motor (it’s okay to use some force if it doesn’t turn easily) until it turns a full circle in either direction.
(The wrench is the best choice)
With the long-handled tool: Enter the chamber through the collar and turn the turntable on the impellers (Waste King models have a hole for this purpose) until it spins - Check the overload protection. When it fires, you’ll see the button expand. Press lightly. If it doesn’t sign back in, let the device sit for 10 minutes and try again.
- Look inside the chamber with a flashlight. NEVER PUT YOUR HANDS IN THE MACHINE. Notice the edge of the plate where it meets the slip ring. Use tongs or tongs to remove debris or obstructions.
If obstructions cannot be removed using normal force, a professional should be consulted. - Turn on the water and try running the machine. The chamber should rotate normally now. If not, repeat the steps.
Due to the nature of the problem, you may need to perform the tasks multiple times.
If the garbage disposal continues to get stuck after many attempts, the service is recommended and should be a claimed warranty.
Unclogging a Garbage Disposal
Although the process of unclogging is primarily maintenance based, we must first deal with the water and debris floating in front of our eyes. After that, we talk about keeping our machines clean and working as long as possible.
Step 1: Empty the sink.
If the sink is clogged, you will see floating debris. We have to take care of that first. After turning off the machine we can collect/siphon the water into a bucket or use a plunger/plumber.
If there is very little water, fill the sink a little more, about 2 inches (10 cm), and start to dive with moderate pressure (the sink is not as strong as the toilet). Do it several times. If you’re lucky, the disposer will be completely unblocked.
If that’s not the case, you can at least move or break the clog a little, which will allow the water to drain faster, and catch fish part of the debris. We’ll explore that below.
Step 2: Free The Chamber
Later we’ll need the chamber to avoid getting stuck on an unexpected piece of junk (after submerging it). There are other steps that are required to get the machine running, and we want to complete these steps as smoothly as possible.
Here’s how we will do it:
- Check the interior with a flashlight for possible obstacles (bones, metal parts, etc.). Pay close attention to the slip ring.
- Use a pair of pliers/tongs and pull them out. NEVER USE YOUR HANDS.
- Turn on the machine and run it on a slow flow of water to check for clogs. If it does get stuck, see “Troubleshooting a humming or stuck garbage disposal”.
Step 3: Remove the P-trap
It’s pretty easy to do down here. All you have to do is remove and clean the P-trap or replace it entirely. The only problem is that it might get a little dirty.
Tools: bucket, paper towel, tongs, hands
Okay, here you will need to do:
- Place a bucket and (paper) towel under the P-trap to catch any spilled mud.
- Unscrew the two nuts on the trap (use plastic hands or metal pliers) and take the trap out. The drain will fall now.
- Look into the trap (and possibly decide whether to replace it with a new one) and clear any debris. Then rinse it under warm water.
- Also, look at the trap arm (coming out of the wall) and clean it if possible.
- Sit Pull back the trap and tighten the nuts (do not over-tighten)
- Turn on your garbage disposal and test.
Now there is nothing stopping the water flow down the drain could stop. Basically, we’re done!
If after all this work the drain is still clogged, it’s time to drink juice to get energy, and then call a professional. You did great!
Maintenance
The best way to deal with clogs and congestion is to prevent them from forming in the first place. So after you’ve done everything, it’s good to keep the do’s and don’ts in mind and remind yourself every time you turn on the device that it’s really annoying when you have these
problems.
You’ll need to “Do”
- Turn on the cold water first, then the disposer. After grinding, continue running cold water for a few seconds to flush the drain line
- Avoid pouring coffee grounds down the drain.
- Occasionally clean the machine and the drain.
You’ll need to “Avoid”
- Pour grease or grease down the drain. Pour into a jar and then dispose of it in the bins.
- use hot water when grinding. However, it’s okay to pour hot water during the session.
- fill the disposer with too large a load of vegetable and/or fruit peelings at a time.
- crush large amounts of eggshells or fibrous material.
- switch off the machine too early when sanding. Let it run another 10-20 seconds with cold running water.
And that’s it, folks! Basically, conscientious and regular cleaning of your machine should keep your device running for a long time.
Conclusion
Well, I think that about covers everything you need to know to tackle most basic garbage disposal repairs yourself! Most of the issues these things run into are pretty simple fixes, so it’s not worth stressing over a big repair bill. Just take your time going through the steps, be careful, and you should be able to resolve whatever’s causing problems.
I won’t lie – it isn’t always the smoothest of sailing. You might hit a snag where something isn’t quite working how you expect. But that’s normal, so don’t get concerned. A little troubleshooting goes a long way. And with the correct replacement parts, I’m sure you’ll get up and running again soon.
Plus, think about all those hours of labor you’re saving yourself! Not having to deal with charging plumbers feels good. You’ll be kicking back tonight knowing you kept a lot of change in your wallet. And who knows, you’ll feel so handy after this you’ll replace the whole thing yourself.
Anyway, I hope this guide makes you confident about tackling disposal dilemmas. But no pressure if you’re ever uncertain – that’s what the pros are for. In the meantime, enjoy that newly fixed appliance! You earned it after conquering this project.
Thanks for sharing!
Welcome..!