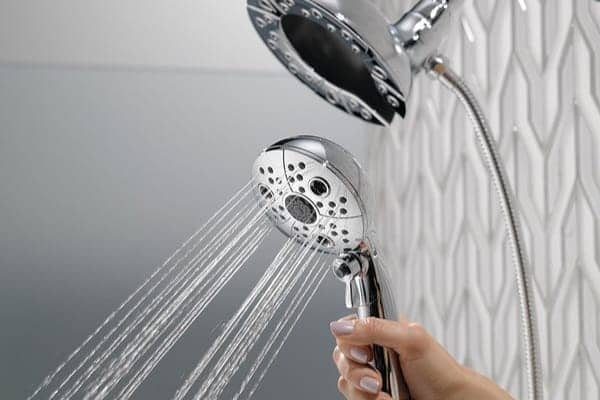
Delta shower heads are renowned for their quality and efficiency, but sometimes you might feel the need for a stronger water flow. One way to achieve this is by removing the flow restrictor from your Delta shower head. In this guide, we’ll walk you through the process, ensuring a smooth and effective removal without causing any damage.
Also, we brought some important information regarding Delta shower. We recommen to check our top rated Delta kitchen faucets and Delta bathroom faucets.
Understanding the Flow Restrictor
Ever notice how your shower seems to have less oomph than it used to? You’re not alone – many have felt their once powerful showerhead losing steam over the years. What gives?
Chances are, a tiny but mighty device called a flow restrictor is behind it. Installed inside most showerheads since the 1990s, this little water saver helps us all conserve our most precious resource. By slowing the flow down to 1.5 gallons per minute or less, it’s done its job keeping us within water use guidelines.
How to remove flow restrictor from delta shower head?
Tools You’ll Need:
- Adjustable Wrench
- Plumber’s Tape
- Flathead Screwdriver
- Needle-nose Pliers
1. Preparation:
Shutting off the water is key, so head to the main valve and give it a turn clockwise until it stops. This ensures no surprise sprays happen while you’ve got your hands inside the showerhead.
Laying down a towel is also wise – you never know when a small O-ring or other part might slip from your grasp. Having a soft place to catch anything that falls prevents lost pieces down the drain.
Now that potential problems are pinned, you’re set to start exploring what makes your shower tick. Open up the head and see how the restrictor regulates the flow. Take notes on its current setup in case you want to switch things back.
2. Locate the Flow Restrictor:
So you’ve shut off the water and laid down your towel – now it’s time to get hands-on with your showerhead. Removing it from the arm is the first step to finding what regulates the flow.
With an adjustable wrench in hand, loosen the connection where pipe meets plastic. Gently unscrew it from the wall and set it down on your towel-covered workspace.
Peering inside is how you’ll spot the culprit behind any weak water pressure woes. Near where it originally joined the arm, look for a small disc made of plastic or rubber. This humble piece is what’s metering out the flow.
Identifying the flow restrictor is the name of the game here. Once you’ve found it tucked within the showerhead, you’ll understand how it works its water-saving magic. But does its setup have you wanting more?
Keep reading to learn how you can tweak it for a stronger spray if desired, just don’t forget to turn the water back on when you’re done!
3. Remove the Flow Restrictor:
Now that you’ve located the flow restrictor within your showerhead, it’s time to remove it if desired. But go slowly – no need to force anything.
Grab your needle-nose pliers or small flathead screwdriver, whichever feels best suited. With care, insert the tip between the restrictor and its housing. Apply gentle pressure to ease it out, being mindful not to bend or break nearby pieces.
Patience is key here, as the restrictor may stick after years of mineral buildup. Wiggle it side to side if needed, but don’t yank with abandon. Taking your time prevents damage that could cause leaks down the line.
Nearly there – once it starts to budge, keep an easy grip as you pull it free. Set it aside so you can inspect both the restrictor and its port. This reveals how it works its flow-regulating magic.
With the restrictor now removed, you’ve gained access to tweak the settings if preferred. Just be sure not to lose any small parts while reassembling when finished!
4. Clean the Shower Head:
With the restrictor removed, don’t miss the chance for some light cleaning as well. Mineral deposits left unchecked can dim your shower’s shine over time.
Grab a toothbrush or bottle brush to gently scrub away any buildup within the nooks of the showerhead. A vinegar soak can also help dissolve stubborn spots if they persist. Rinsing thoroughly removes any cleaning residues before reassembly.
Now that both the restrictor port and showerhead are refreshed, it’s time to put things back together. Apply plumber’s tape to the shower arm threads to form a watertight seal when screwed on.
Hand-tighten the connection, then give it a quarter turn with your adjustable wrench for good measure. Check the seal by flicking water droplets – no leaks means a job well done!
It’s finally time to see your handiwork in action. Turn that water back on and step in to experience the results. Play with the flow as preferred, and enjoy your newly tweaked shower setup. The rewards of rinsing off never felt so good!
Caution:
Now that you’ve learned how to tweak your shower’s flow, it’s important to note a few precautions. While increasing pressure can feel invigorating, removing the restrictor may up your water usage.
Always check local regulations, as some places have strict conservation standards. The last thing anyone wants are fines for going over limits. Sustainability is crucial, so find a balance that respects both you and the environment.
Warranties are another thing to mind. Altering the factory settings could potentially void coverage from the manufacturer down the road. Contact Delta directly if unsure how modifications may impact guarantees or repairs.
With a little care and caution though, you can still optimize your shower experience. Feel free to experiment with restrictor positioning for extra oomph, without going to full flow. And always be ready to replace parts should you decide to resell.
Clean water is a precious resource, so let’s treasure it while also feeling fresh! I hope these tips help you tweak things safely and legally for many rinse-worthy years to come.
How to identify delta shower faucet model?
To identify your Delta shower faucet model, follow these steps:
- Look for the Delta logo: Check the faucet handle, spout, or any visible parts for the distinctive Delta logo. It usually appears as a simple “Delta” or a stylized “D” shape.
- Examine the handle design: Delta offers various handle styles, such as lever handles, knob handles, or cross handles. Take note of the shape, size, and any unique features of your faucet handle.
- Count the number of handles: Determine if your shower faucet has one or multiple handles. This information can help narrow down the model possibilities.
- Measure the distance between the handles: For faucets with multiple handles, measure the distance between them. This measurement, known as the center-to-center measurement, can be useful in identifying the specific model.
- Look for any visible markings: Inspect the faucet body, trim, or other visible parts for any model numbers, codes, or additional markings. These markings can provide valuable clues to identify the specific model.
- Take pictures and consult Delta’s resources: If you’re still uncertain, take clear photos of your faucet from different angles and visit Delta’s official website or contact their customer support. They have helpful resources and experts who can assist you in identifying the model accurately.
How to remove delta shower handle?
Here’s how you can remove a Delta shower handle:
- Prepare your tools: To begin, gather a few essential tools such as a screwdriver (usually Phillips or flathead), an Allen wrench (hex key), and possibly a pair of pliers.
- Locate the set screw: Look for a small screw on the underside of the handle. This screw is often hidden beneath a decorative cap or button. Carefully pry off the cap using a flathead screwdriver or your fingernail to reveal the set screw.
- Loosen the set screw: Once you’ve exposed the set screw, use the appropriate tool (Phillips or Allen wrench) to loosen it. Turn counterclockwise to loosen it, but be sure not to remove the screw entirely as it may fall into the handle mechanism.
- Remove the handle: With the set screw loose, gently pull the handle away from the wall or valve stem. It might require a little wiggle or a firm tug, but be careful not to apply excessive force that could damage the handle or valve.
- Inspect and clean: Take a moment to inspect the handle and valve stem for any signs of wear, debris, or mineral buildup. If necessary, clean these areas with a mild cleaning solution and a soft cloth or toothbrush.
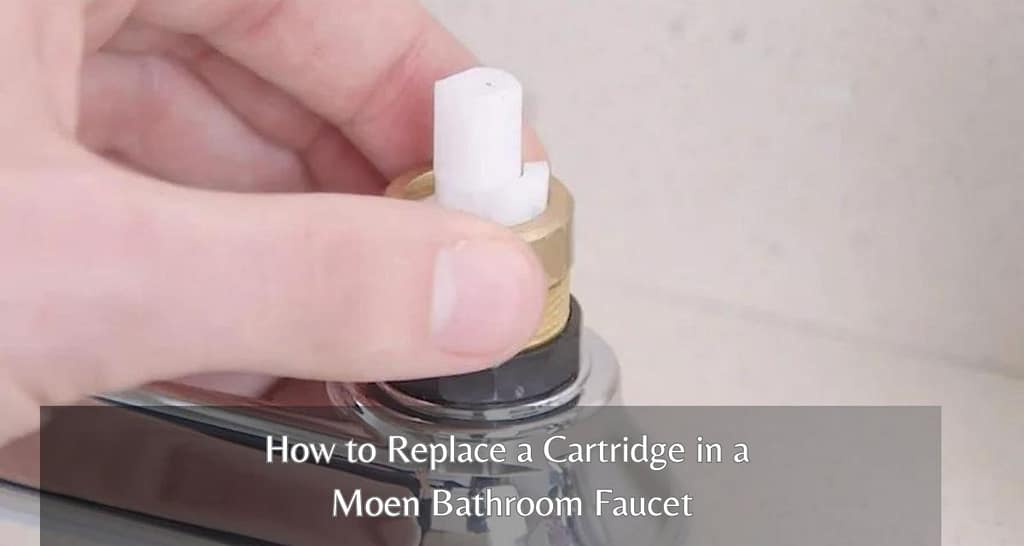
How to replace delta shower cartridge?
Oh, it’s time to swap out the Delta shower cartridge, is it? No worries, I’ll walk you through the process. Follow these steps to replace your Delta shower cartridge:
- Turn off the water supply: Before starting any plumbing work, locate the main water shut-off valve for your shower and turn it off. This precaution ensures a smooth maintenance process without the inconvenience of water flowing during your work.
- Remove the handle and trim: Start by removing the handle and trim of your Delta shower. Look for any screws or bolts securing them in place and use the appropriate tools (usually a screwdriver or Allen wrench) to loosen and remove them.
- Access the cartridge: Once the handle and trim are removed, you’ll have access to the cartridge. Depending on your Delta shower model, you may need to unscrew a retaining nut or use pliers to pull out the cartridge.
- Replace the cartridge: Take the new Delta shower cartridge and align it correctly with the valve body. Make sure it fits snugly and securely in place. Follow any specific instructions provided with the replacement cartridge.
- Reassemble the shower: With the new cartridge in place, reassemble the shower by attaching the trim and handle back onto the valve body. Tighten any screws or bolts securely but be careful not to overtighten.
- Turn on the water supply: Once everything is reassembled, turn the water supply back on by reopening the main water shut-off valve. Check for any leaks around the cartridge and ensure that the water is flowing correctly.
How to adjust delta shower valve?
Here’s how you can adjust your Delta shower valve:
- Locate the valve: First, you need to find the valve, which is usually located behind the shower handle. Look for a round or square plate with a small hole or slot in the middle.
- Remove the handle and trim: To access the valve, you’ll need to remove the handle and trim. Look for any screws or bolts securing them in place and use the appropriate tools (such as a screwdriver or Allen wrench) to loosen and remove them.
- Adjust the rotational limit stop: Inside the valve, you’ll find a rotational limit stop. This stop determines the maximum temperature of the water. To adjust it, locate a plastic or brass disc with grooves or teeth. Rotate it clockwise to decrease the maximum temperature or counterclockwise to increase it. Make small adjustments and test the water temperature until you find the desired setting.
- Reassemble the shower: Once you’re satisfied with the adjustments, reattach the handle and trim. Ensure that everything is securely fastened but be careful not to overtighten.
- Test the water temperature: Turn on the shower and check if the water temperature matches your desired setting. Make further adjustments if necessary until you achieve the desired balance between hot and cold water.
Check our more recommended guides:
- Cleaning kitchen faucet Spray Head?
- How to Replace Cartridge in a Delta Faucet?
- How to install a Soap Dispenser in Your Kitchen?
- How to Prevent Faucets from Freezing?
- Changing the Battery of Touchless Kitchen Faucet
- How to Clean Rinnai Tankless Water Heater?
- How to Install Sprayer in Kitchen Faucet?
- How to Tighten Moen Bathroom Faucet Handle?
- How to Use a Moen Cartridge Puller?